Dear readers,
Yours truly will be presenting at the Collaborate 10 conference in Las Vegas this month on best practices for Oracle Release 12 E-Business Suite patching. Below are the details:
Thursday, April 22
11:00 am - 12:00 pm 3303 Tip and Tricks for Patching R12 Oracle Applications E-Business Suite OAUG Infrastructure Technologies (IT)
Database (DB)
Application Strategy and Services (AS)
Tip and Tricks for Patching R12 Oracle Applications E-Business Suite
Session ID: 3303
Date: Thursday, April 22
Time: 11:00 am - 12:00 pm
Location: South Seas G
Speaker: Benjamin Prusinski
Product Line(s): Oracle E-Business Suite (EBS)
Track: Application Strategy and Services (AS); Database (DB); Infrastructure Technologies (IT)
Description: This session will provide best practices to patch your Oracle R12 EBS environments to ensure maximum availability and performance. Learn best practices on patching Oracle R12 EBS environments to avoid downtime. Learn tools and techniques for patching R12 EBS Oracle Applications. Learn new features in R12 EBS for patching Oracle Applications such as Patch Wizard.
Speaker:
Benjamin Prusinski
Ben Prusinski and Associates
I will also be available in the Oracle ACE lounge so hope to see you all there! My session will provide tips plus real world demos with Oracle Release 12 E-Business Suite.
Showing posts with label R12 E-Business. Show all posts
Showing posts with label R12 E-Business. Show all posts
Wednesday, April 7, 2010

Thursday, March 18, 2010
Cloning Release 12: Oracle Applications Part II: Rapid Clone techniques
In the previous blog post, I walked you through the pre-clone steps for Release 12 with Oracle E-Business Suite. Now that our pre-clone is complete, its time to do the actual cloning operation. With Release 12 for Oracle Applications, Oracle provides
a useful perl script called adcfgclone.pl as part of Rapid Clone that performs most of the heavy lifting for cloning the E-Business Suite. In addition to years of experience an an Oracle Apps DBA, I referenced the following MyOracleSupport (formerly Metalink) notes listed below to guide me in the cloning for the E-Business Suite:
Note: 406982.1 - Cloning Oracle Applications Release 12 with Rapid Clone
Note: 603104.1 - Troubleshooting RapidClone issues with Oracle Applications R12
In a nutshell the cloning process is as follows:
========================================================
I. Clone database tier from source to target environment
II. Clone applications tier from source to target
Cloning Release 12 Oracle E-Business Suite with Rapid Clone
Ok so we ran the adpreclone.pl scripts from last time and finished the prep work for the cloning. So how do we do the actual cloning or refresh for Release 12?
Actually the answer is that it depends on your environment. You can do a hot clone using the Oracle Applications Management Pack (AMP) with Oracle Enterprise Manager (OEM) Grid Control to cut down on downtime window. However that requires additional licensing and installation time. Or you could use RMAN or an Oracle hot backup to take the copy of your source database tier and clone to the target environment. However, for our example, we will use a simple cold backup to copy over the apps tier and database tier from our Source EBS environment to our target system.
As I mentioned above, for cloning an Oracle Applications environment, you would use your backup as well as copy commands manually or via a series of UNIX or Linux shell scripts to copy over the apps and db tier as part of the cloning.
However, in my test environment, I do not have an extra 300Gb of disk space
so we will use the Unix/Linux mv (move) commands to simulate the clone procedures.
If you decide to use the Oracle Recovery Manager (RMAN) utility to clone the database the procedure will be different.
Reference the Oracle documentation on usage for RMAN for details.
Some details on how to use RMAN to do this are listed below:
Note: 362473.1 - Cloning E-Business Suite Using Hot Backup for Minimal Downtime of Source Environment
Oracle® Database Backup and Recovery Basics 10g Release 2 (10.2)
http://download.oracle.com/docs/cd/B19306_01/backup.102/b14192/toc.htm
Oracle® Database Backup and Recovery Advanced User's Guide 10g Release 2 (10.2)
http://download.oracle.com/docs/cd/B19306_01/backup.102/b14191/toc.htm
In my opinion, you should use the RMAN Duplicate database command to take a hot backup of the database tier.
This works well and details are provided in
Note: 228257.1 RMAN 'Duplicate Database' Feature in Oracle9i / 10G and 11G
Note: If your database tier server is on 11gR1 or 11gR2 the new features for RMAN such as encrypted backups, Data Recovery Advisor (DRA), et al may also be of use to your backup and recovery strategy at future date. I have a blog
post on 11g RMAN new features in a previous blog post if you have questions on how this works with RMAN and 11g.
Ok so let's get started and cloning! First, we start with cloning the database tier.
On the database tier, we login as the oracle OS user and shutdown both the listener and database:


I. Clone Source database tier to target database tier server
Since we are simulating a clone procedure we create the new clone directory for database and applications tiers as follows:
mkdir -p /dbtier12/CLONE
mkdir -p /appstier12/CLONE
Before we use Rapid Clone script (adcfgclone.pl) we need to copy over the database and application tier files.
First we copy the application tier file system
Log on to the source system application tier nodes as the APPLMGR user and shut down the application tier server processes. Copy the following application tier directories from the source node to the target application tier node:
$APPL_TOP
$COMMON_TOP
Applications Technology Stack:
Oracle 10gAS 10.1.2 Tools ORACLE_HOME
Oracle 10gAS 10.1.3 Web ($IAS_ORACLE_HOME)
So this means that for the Apps tier you need to copy over the $INST_TOP, $COMMON_TOP, $APPL_TOP, 10.1.2 ORACLE_HOME, and 10.1.3 ORACLE_HOME directories and files

Copy the database node file system
Log on to the source system database node as the ORACLE user:
1. Perform a normal shutdown of the source system database
2. Copy the database (.dbf) files from the source system to the target system
3. Copy the source database ORACLE_HOME to the target system
4. Start the source Applications system database and application tier processes
For the database tier this includes the datafiles, parameter file (init.ora, spfile) and tnsnames.ora files

In this test environment, I do not have 300+ Gb of disk space so we simulated the copy with the UNIX/Linux mv command. However in a real world environment you would use the cp or scp command to transfer files from source to target systems. You would need to shutdown the database and take a cold backup of the database and apps tiers unless you do hot cloning and hot backup.
So now on the target we have the following clone directories:
1) Apps tier for CLONE
/apptier12/CLONE base directory for apps tier
-> 10.1.2 for CLONE ORACLE_HOME 10.1.2
-> 10.1.3 for CLONE ORACLE_HOME 10.1.3
-> appl for CLONE APPL_TOP
-> comn for CLONE COMMON_TOP
2) db tier for CLONE
/dbtier12/CLONE
CLONE 10g ORACLE_HOME -> /dbtier12/CLONE/10.2.0
CLONE datafiles /dbtier12/CLONE/db/apps_st/data
/dbtier12/CLONE/db/tech_st
We will need to keep track of this information for the upcoming step when we run the clone scripts!
Do not set the environment files for the database tier! We need a clean slate for
the database tier clone procedure.
Note: if you decide to do a copy of the db and apps tier files from your source to target system, you will need to start the database tier and apps tier services on the source system. In this example we did a Unix/Linux move (mv) to simulate the copy
so we do not start the apps tier and db tier since both source and target are on
the same virtual machine.
Run the clone script for db tier this is called adcfgclone.pl we can take a sneak peak at it with vi or emacs or whatever your favorite editor

perl adcfgclone.pl dbTier

How the clone script flows
adcfgclone.pl calls the script adchkutil.sh which then calls forth the script adclone.pl and adclonectx.pl
Note: if you do not have PD ksh installed the work around to get adcfgclone.pl working is to edit the adchkutil.sh script to comment out the reference in the script to look for the PD ksh shell.
Clone source database tier to target database tier
cd /dbtier12/CLONE/10.2.0/appsutil/clone/bin
perl adcfgclone.pl dbTier
enter the password for APPS then hit the key
enter the details for target system at the prompts
In our case we take the defaults since we are cloning from source to target on same system as shown in the example below

Once we enter the choices for the prompt settings the clone will begin for the db tier. You will need to enter settings for your target clone datafile location (DATA_TOP) as well as database tier ORACLE_HOME location, and other settings such as port pool.
Time to go for a coffee break! It will take some time and depends on the size of your database. I have scripts for cloning that I usually fire off at night time and babysit to make sure all runs smoothly.

You can tail the log file to keep track of your cloning operation. I like to dump the clone output to a logfile as part of a script to verify things.

When it finishes you should see a successful screen like below:

Rapid Clone starts the listener and database back up once the clone is created. We can run a few simple commands to verify that our new database clone is online and available:

My clone took about 90 minutes for the database tier since I have a very slow server running in a virtual machine. Your mileage may vary based on hardware, OS and available resources. Now lets clone the apps tier and finish our cloning!
Clone Source applications tier to target applications tier
Now that our database tier has been cloned its time to clone the apps tier to the new target! We run the adfgclone.pl script on the source apps tier as shown below:
For our example, The cloning script for the apps tier lives under the
following directory:
$ cd $INST_TOP/clone/bin
Login as the applmgr OS user and we run it with the following syntax:
perl adcfgclone.pl appsTier

Cloning the Applications Tier
Since I do not have the PD ksh installed it errors and then I need to edit the adchkutl.sh script which is called by adcfgclone.pl like last time so that it does not try to search for the PD ksh.
Rapid Clone uses a questionaire to prompt us for the details for the source to target cloning for the applications tier similar to the questionaire in the cloning script (adcfgclone.pl) that we ran earlier to clone the database tier.
We enter the following for the target apps tier system prompts:
target system base directory: /appstier12/CLONE
target system Forms ORACLE_HOME /appstier12/CLONE/10.1.2
target system Web ORACLE_HOME /appstier12/CLONE/10.1.3
choose 0 for port pool like we did earlier for db tier clone
A complete list is given below:

Now we want to keep a close watch on the logs to make sure no errors occur during the cloning for the apps tier in which we tail the logfile:

Are you ready for another coffee break? I sure hope so because I am! So lets grab a mocha and maybe a donut while this clone runs for the next few hours. I usually run a clone script at night time and check it every half hour until its done.
In between the coffee and donut break, I check the status and its at 50% and before I can drink the java or eat my donut a frantic Oracle project manager and functional analyst are waiting for me in my DBA cube!

I calm the functional team down and fix their performance issue. Was resource problem with JVM for the apps tier for another environment. I will blog on a solution to this in future post. OK so we check our clone and enter additional prompts after we had to restart it after it failed due to port issue that I fixed and re-started the clone.

Our clone finishes and all of the app tier services are started automatically by Rapid Clone (adcfgclone.pl) script.


And we have verification without errors.

Troubleshooting Errors during Rapid Clone - Appstier
Recall that earlier our clone failed at 74% during the cloning for the applications tier when we ran adcfgclone.pl appsTier so I checked
the logfile under
/appstier12/CLONE/inst/apps/CLONE_tusebs/admin/log to find the
specific failure since it failed during the ApplyAppsTier phase
After looking at the logfile ApplyAppsTier_02251717.log I found the root cause
why my clone failed was due to unable to connect to the listener and database.
The port pool needs to be same on database and applications tier
so if you set 0 as port pool during adcfgclone.pl dbTier for db tier you MUST USE same port pool for clone with apps tier or the clone will fail during Appstier apply phase!!!
For Linux, you can use lsof command to find ports in use and use kill command to free up these ports.
After the cloning scripts have run successfully, the apps and db tiers will be started automatically by the Rapid Clone scripts.
I then reviewed the logs under
/appstier12/CLONE/comn/clone/bin
for both the source database and applications tiers and verified that all application and database services are available.
Next we need to verify that, users can login to OAM as cloned environment.
Sure enough, I hit the dreaded 500 Internal Error when I tried to login to the OAM website.
Here are some good troubleshooting notes if you have 500 Internal errors when attempt to access the OAM login page
Note: 761869.1 500 Internal Server Error
Note: 813523.1 500 Internal Server
Note: 443353.1 Guest Password mismatch
Note: 564536.1 ADSTRTAL.SH returns error TIMEOUT OUT Interrupted Exception
Note: 331322.1
Note: 391406.1 How to get a clean Autoconfig
Note: 387859.1 Autoconfig R12
I used these to resolve the issue which involved changing settings for the context file to allow JVM to function correctly without consuming all server resources as well as bouncing the app and database tiers on the target clone server.
After all was said and done, I verified that things worked for my new clone.

As a final sanity check, I checked the database and application tier servers for the new cloned environment.

Good the cloned database is functional and available. Lastly, I checked that all of the application tier services were online.

Finishing Tasks for Cloning Operations
1. Workflow settings for new clone
2. Verify login and accounts work correctly
3. Check status for SSO and OID
While we did not check on workflow, this is one area that you must address in your cloned environments. Also, run tests to check that the authentication is working correctly with accounts that use SSO and OID. If you do not perform these checks then users will have problems logging into the cloned systems after a refresh.
Congratulations! You now can perform the cloning and refresh tasks that are critical skills to have as a hardcore Oracle Apps DBA!
a useful perl script called adcfgclone.pl as part of Rapid Clone that performs most of the heavy lifting for cloning the E-Business Suite. In addition to years of experience an an Oracle Apps DBA, I referenced the following MyOracleSupport (formerly Metalink) notes listed below to guide me in the cloning for the E-Business Suite:
Note: 406982.1 - Cloning Oracle Applications Release 12 with Rapid Clone
Note: 603104.1 - Troubleshooting RapidClone issues with Oracle Applications R12
In a nutshell the cloning process is as follows:
========================================================
I. Clone database tier from source to target environment
II. Clone applications tier from source to target
Cloning Release 12 Oracle E-Business Suite with Rapid Clone
Ok so we ran the adpreclone.pl scripts from last time and finished the prep work for the cloning. So how do we do the actual cloning or refresh for Release 12?
Actually the answer is that it depends on your environment. You can do a hot clone using the Oracle Applications Management Pack (AMP) with Oracle Enterprise Manager (OEM) Grid Control to cut down on downtime window. However that requires additional licensing and installation time. Or you could use RMAN or an Oracle hot backup to take the copy of your source database tier and clone to the target environment. However, for our example, we will use a simple cold backup to copy over the apps tier and database tier from our Source EBS environment to our target system.
As I mentioned above, for cloning an Oracle Applications environment, you would use your backup as well as copy commands manually or via a series of UNIX or Linux shell scripts to copy over the apps and db tier as part of the cloning.
However, in my test environment, I do not have an extra 300Gb of disk space
so we will use the Unix/Linux mv (move) commands to simulate the clone procedures.
If you decide to use the Oracle Recovery Manager (RMAN) utility to clone the database the procedure will be different.
Reference the Oracle documentation on usage for RMAN for details.
Some details on how to use RMAN to do this are listed below:
Note: 362473.1 - Cloning E-Business Suite Using Hot Backup for Minimal Downtime of Source Environment
Oracle® Database Backup and Recovery Basics 10g Release 2 (10.2)
http://download.oracle.com/docs/cd/B19306_01/backup.102/b14192/toc.htm
Oracle® Database Backup and Recovery Advanced User's Guide 10g Release 2 (10.2)
http://download.oracle.com/docs/cd/B19306_01/backup.102/b14191/toc.htm
In my opinion, you should use the RMAN Duplicate database command to take a hot backup of the database tier.
This works well and details are provided in
Note: 228257.1 RMAN 'Duplicate Database' Feature in Oracle9i / 10G and 11G
Note: If your database tier server is on 11gR1 or 11gR2 the new features for RMAN such as encrypted backups, Data Recovery Advisor (DRA), et al may also be of use to your backup and recovery strategy at future date. I have a blog
post on 11g RMAN new features in a previous blog post if you have questions on how this works with RMAN and 11g.
Ok so let's get started and cloning! First, we start with cloning the database tier.
On the database tier, we login as the oracle OS user and shutdown both the listener and database:


I. Clone Source database tier to target database tier server
Since we are simulating a clone procedure we create the new clone directory for database and applications tiers as follows:
mkdir -p /dbtier12/CLONE
mkdir -p /appstier12/CLONE
Before we use Rapid Clone script (adcfgclone.pl) we need to copy over the database and application tier files.
First we copy the application tier file system
Log on to the source system application tier nodes as the APPLMGR user and shut down the application tier server processes. Copy the following application tier directories from the source node to the target application tier node:
$APPL_TOP
$COMMON_TOP
Applications Technology Stack:
Oracle 10gAS 10.1.2 Tools ORACLE_HOME
Oracle 10gAS 10.1.3 Web ($IAS_ORACLE_HOME)
So this means that for the Apps tier you need to copy over the $INST_TOP, $COMMON_TOP, $APPL_TOP, 10.1.2 ORACLE_HOME, and 10.1.3 ORACLE_HOME directories and files

Copy the database node file system
Log on to the source system database node as the ORACLE user:
1. Perform a normal shutdown of the source system database
2. Copy the database (.dbf) files from the source system to the target system
3. Copy the source database ORACLE_HOME to the target system
4. Start the source Applications system database and application tier processes
For the database tier this includes the datafiles, parameter file (init.ora, spfile) and tnsnames.ora files

In this test environment, I do not have 300+ Gb of disk space so we simulated the copy with the UNIX/Linux mv command. However in a real world environment you would use the cp or scp command to transfer files from source to target systems. You would need to shutdown the database and take a cold backup of the database and apps tiers unless you do hot cloning and hot backup.
So now on the target we have the following clone directories:
1) Apps tier for CLONE
/apptier12/CLONE base directory for apps tier
-> 10.1.2 for CLONE ORACLE_HOME 10.1.2
-> 10.1.3 for CLONE ORACLE_HOME 10.1.3
-> appl for CLONE APPL_TOP
-> comn for CLONE COMMON_TOP
2) db tier for CLONE
/dbtier12/CLONE
CLONE 10g ORACLE_HOME -> /dbtier12/CLONE/10.2.0
CLONE datafiles /dbtier12/CLONE/db/apps_st/data
/dbtier12/CLONE/db/tech_st
We will need to keep track of this information for the upcoming step when we run the clone scripts!
Do not set the environment files for the database tier! We need a clean slate for
the database tier clone procedure.
Note: if you decide to do a copy of the db and apps tier files from your source to target system, you will need to start the database tier and apps tier services on the source system. In this example we did a Unix/Linux move (mv) to simulate the copy
so we do not start the apps tier and db tier since both source and target are on
the same virtual machine.
Run the clone script for db tier this is called adcfgclone.pl we can take a sneak peak at it with vi or emacs or whatever your favorite editor

perl adcfgclone.pl dbTier

How the clone script flows
adcfgclone.pl calls the script adchkutil.sh which then calls forth the script adclone.pl and adclonectx.pl
Note: if you do not have PD ksh installed the work around to get adcfgclone.pl working is to edit the adchkutil.sh script to comment out the reference in the script to look for the PD ksh shell.
Clone source database tier to target database tier
cd /dbtier12/CLONE/10.2.0/appsutil/clone/bin
perl adcfgclone.pl dbTier
enter the password for APPS then hit the
enter the details for target system at the prompts
In our case we take the defaults since we are cloning from source to target on same system as shown in the example below

Once we enter the choices for the prompt settings the clone will begin for the db tier. You will need to enter settings for your target clone datafile location (DATA_TOP) as well as database tier ORACLE_HOME location, and other settings such as port pool.
Time to go for a coffee break! It will take some time and depends on the size of your database. I have scripts for cloning that I usually fire off at night time and babysit to make sure all runs smoothly.

You can tail the log file to keep track of your cloning operation. I like to dump the clone output to a logfile as part of a script to verify things.

When it finishes you should see a successful screen like below:

Rapid Clone starts the listener and database back up once the clone is created. We can run a few simple commands to verify that our new database clone is online and available:

My clone took about 90 minutes for the database tier since I have a very slow server running in a virtual machine. Your mileage may vary based on hardware, OS and available resources. Now lets clone the apps tier and finish our cloning!
Clone Source applications tier to target applications tier
Now that our database tier has been cloned its time to clone the apps tier to the new target! We run the adfgclone.pl script on the source apps tier as shown below:
For our example, The cloning script for the apps tier lives under the
following directory:
$ cd $INST_TOP/clone/bin
Login as the applmgr OS user and we run it with the following syntax:
perl adcfgclone.pl appsTier

Cloning the Applications Tier
Since I do not have the PD ksh installed it errors and then I need to edit the adchkutl.sh script which is called by adcfgclone.pl like last time so that it does not try to search for the PD ksh.
Rapid Clone uses a questionaire to prompt us for the details for the source to target cloning for the applications tier similar to the questionaire in the cloning script (adcfgclone.pl) that we ran earlier to clone the database tier.
We enter the following for the target apps tier system prompts:
target system base directory: /appstier12/CLONE
target system Forms ORACLE_HOME /appstier12/CLONE/10.1.2
target system Web ORACLE_HOME /appstier12/CLONE/10.1.3
choose 0 for port pool like we did earlier for db tier clone
A complete list is given below:

Now we want to keep a close watch on the logs to make sure no errors occur during the cloning for the apps tier in which we tail the logfile:

Are you ready for another coffee break? I sure hope so because I am! So lets grab a mocha and maybe a donut while this clone runs for the next few hours. I usually run a clone script at night time and check it every half hour until its done.
In between the coffee and donut break, I check the status and its at 50% and before I can drink the java or eat my donut a frantic Oracle project manager and functional analyst are waiting for me in my DBA cube!

I calm the functional team down and fix their performance issue. Was resource problem with JVM for the apps tier for another environment. I will blog on a solution to this in future post. OK so we check our clone and enter additional prompts after we had to restart it after it failed due to port issue that I fixed and re-started the clone.

Our clone finishes and all of the app tier services are started automatically by Rapid Clone (adcfgclone.pl) script.


And we have verification without errors.

Troubleshooting Errors during Rapid Clone - Appstier
Recall that earlier our clone failed at 74% during the cloning for the applications tier when we ran adcfgclone.pl appsTier so I checked
the logfile under
/appstier12/CLONE/inst/apps/CLONE_tusebs/admin/log to find the
specific failure since it failed during the ApplyAppsTier phase
After looking at the logfile ApplyAppsTier_02251717.log I found the root cause
why my clone failed was due to unable to connect to the listener and database.
The port pool needs to be same on database and applications tier
so if you set 0 as port pool during adcfgclone.pl dbTier for db tier you MUST USE same port pool for clone with apps tier or the clone will fail during Appstier apply phase!!!
For Linux, you can use lsof command to find ports in use and use kill command to free up these ports.
After the cloning scripts have run successfully, the apps and db tiers will be started automatically by the Rapid Clone scripts.
I then reviewed the logs under
/appstier12/CLONE/comn/clone/bin
for both the source database and applications tiers and verified that all application and database services are available.
Next we need to verify that, users can login to OAM as cloned environment.
Sure enough, I hit the dreaded 500 Internal Error when I tried to login to the OAM website.
Here are some good troubleshooting notes if you have 500 Internal errors when attempt to access the OAM login page
Note: 761869.1 500 Internal Server Error
Note: 813523.1 500 Internal Server
Note: 443353.1 Guest Password mismatch
Note: 564536.1 ADSTRTAL.SH returns error TIMEOUT OUT Interrupted Exception
Note: 331322.1
Note: 391406.1 How to get a clean Autoconfig
Note: 387859.1 Autoconfig R12
I used these to resolve the issue which involved changing settings for the context file to allow JVM to function correctly without consuming all server resources as well as bouncing the app and database tiers on the target clone server.
After all was said and done, I verified that things worked for my new clone.

As a final sanity check, I checked the database and application tier servers for the new cloned environment.

Good the cloned database is functional and available. Lastly, I checked that all of the application tier services were online.

Finishing Tasks for Cloning Operations
1. Workflow settings for new clone
2. Verify login and accounts work correctly
3. Check status for SSO and OID
While we did not check on workflow, this is one area that you must address in your cloned environments. Also, run tests to check that the authentication is working correctly with accounts that use SSO and OID. If you do not perform these checks then users will have problems logging into the cloned systems after a refresh.
Congratulations! You now can perform the cloning and refresh tasks that are critical skills to have as a hardcore Oracle Apps DBA!
Tuesday, February 16, 2010
Fusion Middleware Integration with Oracle E-Business Suite: Part I: SOA Suite and Release 12
In this series, I will explain in detail how to configure Oracle Fusion Middleware SOA Suite with the Oracle E-Business Suite for Release 12 Oracle applications. This post will cover how to install the Oracle 10g SOA Suite for Fusion Middleware. Part II will provide details on the actual tasks required to integrate Fusion Middleware components for the SOA Suite with E-Business Release 12.
First, download the SOA Suite files from OTN (http://otn.oracle.com). For this series, we will use supported configurations, as such SOA Suite 10.1.3.5.0 with Oracle Release 12.
Oracle Enterprise Linux 5.2 will be used as the platform for SOA Suite 10g with Oracle EBS 12.0.1.
Preparation
1a. Download SOA 10.1.3.1.0 from OTN or Oracle Edelivery
I recommend that you first review the Deployment Guide for Oracle Application Server 10g Release 3 (10.1.3.1.0) available from:
http://download.oracle.com/docs/cd/B31017_01/core.1013/b28939.pdf
Oracle® Application Server
Enterprise Deployment Guide
10g Release 3 (10.1.3.1.0)
B28939-03
In order to save you time and the 200+ pages of documentation, we can simplify the steps for installation of the Oracle 10g SOA Suite.
First we need to install and configure the schemas for the SOA suite. These schemas are deployed via the irca.sh script located under the ORACLE_HOME directory for SOA Suite after you unzip the files for SOA Suite.
1. Install schemas for SOA
$ cd /install/soa_schemas/irca
./irca.sh
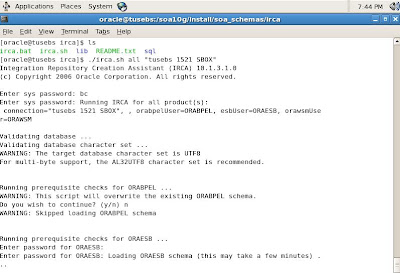
Verify that the SOA schemas have been created without errors.

The irca.sh script will generate a log file that outputs schema object creation
For example: my installation created a log file called irca2010-02-10_07-19-43PM.log

Now that we have created the schemas for SOA Suite and populated the schemas with required metadata, we are ready to install the SOA Suite. Unzip the files that you downloaded earlier and start the installation by executing the runInstaller script.
2. Install SOA suite
The splash screen will begin as long as all prerequisites have been met.
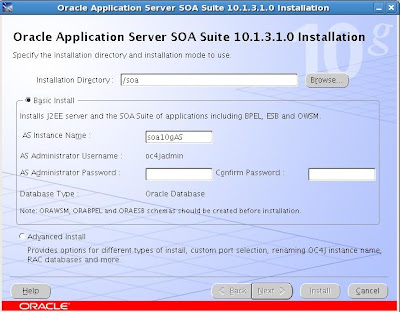
For our test SOA Suite deployment, I used the following entries for the 10g AS instance and administrator account (oc4jadmin):
AS Instance name: soa10gAS
AS administrator: oc4jadmin
Schemas
orabpel
oraesb
orawsm
Oracle:
sys
system/manager
EBS R12:
apps/apps
sysadmin/sysadmin

Next we need to enter details for the orainventory location:

After this runs, we need to run the orainstRoot.sh script as root user in another terminal window.

After the orainstRoot.sh script performs the oraInventory pointer file setup, we are ready to kickoff the installation for SOA Suite.
Now the Oracle installer (OUI) for SOA Suite runs the pre-requisite checks before installation begins. Since we are running an instance of EBS R12 already on the same server for test purposes, these already have been met to comply with kernel and system requirements for SOA Suite.

The installation begins after we confirm these are satisfied and on my test environment ran for a few hours since I have a slow 2Gb server with R12 EBS competing for resources with SOA Suite.

So after we take a break or lunch, we continue the installation.
Now we need to run the root.sh script in another terminal session as root.

We enter the prompts for directory and take defaults.

After a few hours, the installation process completes.
However, we have it fail at the end on configuration assistants during opmn (Oracle Process Manager) on a timeout process error. The solution to this issue which most likely is a bug in 10gAS (Oracle Application Server) is to stop opmn gracefully and kill any open opmn processes.
For reference, our test SOA Suite has the following details:
URL welcome page
http://tusebs.localdomain:8889
OEM 10g AS for Oracle 10g Application Server control and management
http://tusebs.localdomain:8889/em
Instance name: soa10gAS.tusebs.localdomain
Like most Fusion Middleware products, Oracle 10g Application Server is a cornerstone. However, future direction from Oracle appears to be that Oracle 10g Application Server will most likely be replaced eventually by Web Logic server.
Now that the installation has completed for SOA Suite, we need to apply a patch.
3. Install patch for SOA Suite
Download patch from OTN (http://otn.oracle.com)
$ unzip ias_linux_x86_101350.zip
$ cd Disk1
./runInstaller &

So after an hour or so, the patch for SOA Suite 10g completes and fails due to a bug most likely with SOA Suite.
Note: there is a bug in SOA suite due to issue with 10gAS with the opmnctl utility.
What happens is that the install will fail at end of the setup.
First we need to check status for the SOA processes.

Some tips on how to use OPMNCTL :

Uh oh, looks like SOA Suite processes are down.
The solution is to finish install for the patch and to manually kill the opmnctl processes for SOA suite.
Note: be careful to kill ONLY SOA suite opmnctl processes and NOT those for EBS Suite!
Use ps -ef|grep opmnctl to find the process ids and kill these. Then start opmnctl processes manually from the SOA ORACLE_HOME directory.
Run the following opmnctl commands from SOA ORACLE_HOME/opmn/bin directory:
$ opmnctl startall
$ opmnctl startproc ias-component=ASG

Now we need to restart the patch installer from SOA ORACLE_HOME directory and enter password for oc4jadmin screen
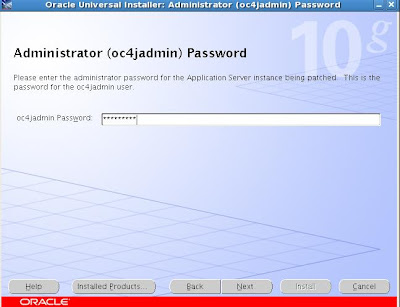
Next we need to enter password for OWSM schema

Click ok because it will shutdown the application middle tier for the SOA suite as part of the patch configuration process.

Now you will see the preview screen listing details for the patch with SOA Suite.
For the summary page, you just need to review and click ok to install the patch for SOA 10g Suite.

The patch takes about 30-90 minutes to run based on server performance. With my test server on VMWare with 2Gb of memory allocated to the VM, it ran about 90 minutes and was very slow because I also have a full blown R12 EBS environment installed.
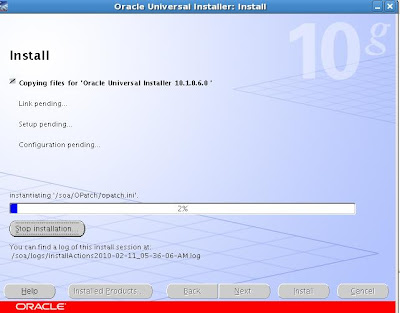
As part of the final configuration for the SOA patch, we need to run the root.sh script as root user to finish the patch for SOA suite.
# cd /soa
# ./root.sh
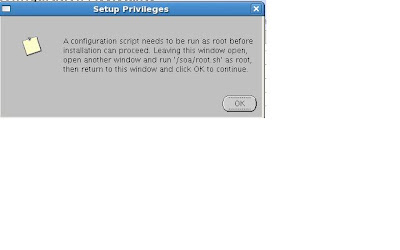
The root.sh script configures privileges required for the SOA Suite installation.
The patch installation completes successfully.

However we need to check and if required, start the processes for SOA Suite for 10g Application Server.
We use opmnctl to start and validate all processes for SOA suite are back online

Verify that SOA Suite is available and login to welcome page
Oracle 10g SOA Suite uses the following URL for default installation:
http://hostname:port
Example: http://tusebs:8889 will show 10gAS site
You can access BPEL and other SOA tools from this page
We need to verify that SSO is working for Single Sign on with SOA Suite
Navigate to http://tusebs:8889/BPELConsole

After we login to BPEL we can check the settings for the SOA Suite:

These settings will be used at a later point to configure SOA Suite for BPEL with Oracle Applications Release 12.

Now we also want to verify that all is functioning with the Oracle 10g AS environment since this plays an key role in SOA Suite operations. We navigate to the main 10g AS console site.
By default this is under the URL:
http://host:port/em
For example, our test server uses http://tusebs:8889/em

Stay tuned for the next installment when we complete the steps to show you how to integrate the Oracle 10g SOA Suite with Oracle E-Business Suite Release 12!
First, download the SOA Suite files from OTN (http://otn.oracle.com). For this series, we will use supported configurations, as such SOA Suite 10.1.3.5.0 with Oracle Release 12.
Oracle Enterprise Linux 5.2 will be used as the platform for SOA Suite 10g with Oracle EBS 12.0.1.
Preparation
1a. Download SOA 10.1.3.1.0 from OTN or Oracle Edelivery
I recommend that you first review the Deployment Guide for Oracle Application Server 10g Release 3 (10.1.3.1.0) available from:
http://download.oracle.com/docs/cd/B31017_01/core.1013/b28939.pdf
Oracle® Application Server
Enterprise Deployment Guide
10g Release 3 (10.1.3.1.0)
B28939-03
In order to save you time and the 200+ pages of documentation, we can simplify the steps for installation of the Oracle 10g SOA Suite.
First we need to install and configure the schemas for the SOA suite. These schemas are deployed via the irca.sh script located under the ORACLE_HOME directory for SOA Suite after you unzip the files for SOA Suite.
1. Install schemas for SOA
$ cd /install/soa_schemas/irca
./irca.sh

Verify that the SOA schemas have been created without errors.

The irca.sh script will generate a log file that outputs schema object creation
For example: my installation created a log file called irca2010-02-10_07-19-43PM.log

Now that we have created the schemas for SOA Suite and populated the schemas with required metadata, we are ready to install the SOA Suite. Unzip the files that you downloaded earlier and start the installation by executing the runInstaller script.
2. Install SOA suite
The splash screen will begin as long as all prerequisites have been met.

For our test SOA Suite deployment, I used the following entries for the 10g AS instance and administrator account (oc4jadmin):
AS Instance name: soa10gAS
AS administrator: oc4jadmin
Schemas
orabpel
oraesb
orawsm
Oracle:
sys
system/manager
EBS R12:
apps/apps
sysadmin/sysadmin

Next we need to enter details for the orainventory location:

After this runs, we need to run the orainstRoot.sh script as root user in another terminal window.

After the orainstRoot.sh script performs the oraInventory pointer file setup, we are ready to kickoff the installation for SOA Suite.
Now the Oracle installer (OUI) for SOA Suite runs the pre-requisite checks before installation begins. Since we are running an instance of EBS R12 already on the same server for test purposes, these already have been met to comply with kernel and system requirements for SOA Suite.

The installation begins after we confirm these are satisfied and on my test environment ran for a few hours since I have a slow 2Gb server with R12 EBS competing for resources with SOA Suite.

So after we take a break or lunch, we continue the installation.
Now we need to run the root.sh script in another terminal session as root.

We enter the prompts for directory and take defaults.

After a few hours, the installation process completes.
However, we have it fail at the end on configuration assistants during opmn (Oracle Process Manager) on a timeout process error. The solution to this issue which most likely is a bug in 10gAS (Oracle Application Server) is to stop opmn gracefully and kill any open opmn processes.
For reference, our test SOA Suite has the following details:
URL welcome page
http://tusebs.localdomain:8889
OEM 10g AS for Oracle 10g Application Server control and management
http://tusebs.localdomain:8889/em
Instance name: soa10gAS.tusebs.localdomain
Like most Fusion Middleware products, Oracle 10g Application Server is a cornerstone. However, future direction from Oracle appears to be that Oracle 10g Application Server will most likely be replaced eventually by Web Logic server.
Now that the installation has completed for SOA Suite, we need to apply a patch.
3. Install patch for SOA Suite
Download patch from OTN (http://otn.oracle.com)
$ unzip ias_linux_x86_101350.zip
$ cd Disk1
./runInstaller &

So after an hour or so, the patch for SOA Suite 10g completes and fails due to a bug most likely with SOA Suite.
Note: there is a bug in SOA suite due to issue with 10gAS with the opmnctl utility.
What happens is that the install will fail at end of the setup.
First we need to check status for the SOA processes.

Some tips on how to use OPMNCTL :

Uh oh, looks like SOA Suite processes are down.
The solution is to finish install for the patch and to manually kill the opmnctl processes for SOA suite.
Note: be careful to kill ONLY SOA suite opmnctl processes and NOT those for EBS Suite!
Use ps -ef|grep opmnctl to find the process ids and kill these. Then start opmnctl processes manually from the SOA ORACLE_HOME directory.
Run the following opmnctl commands from SOA ORACLE_HOME/opmn/bin directory:
$ opmnctl startall
$ opmnctl startproc ias-component=ASG

Now we need to restart the patch installer from SOA ORACLE_HOME directory and enter password for oc4jadmin screen

Next we need to enter password for OWSM schema

Click ok because it will shutdown the application middle tier for the SOA suite as part of the patch configuration process.

Now you will see the preview screen listing details for the patch with SOA Suite.
For the summary page, you just need to review and click ok to install the patch for SOA 10g Suite.

The patch takes about 30-90 minutes to run based on server performance. With my test server on VMWare with 2Gb of memory allocated to the VM, it ran about 90 minutes and was very slow because I also have a full blown R12 EBS environment installed.

As part of the final configuration for the SOA patch, we need to run the root.sh script as root user to finish the patch for SOA suite.
# cd /soa
# ./root.sh

The root.sh script configures privileges required for the SOA Suite installation.
The patch installation completes successfully.

However we need to check and if required, start the processes for SOA Suite for 10g Application Server.
We use opmnctl to start and validate all processes for SOA suite are back online

Verify that SOA Suite is available and login to welcome page
Oracle 10g SOA Suite uses the following URL for default installation:
http://hostname:port
Example: http://tusebs:8889 will show 10gAS site
You can access BPEL and other SOA tools from this page
We need to verify that SSO is working for Single Sign on with SOA Suite
Navigate to http://tusebs:8889/BPELConsole

After we login to BPEL we can check the settings for the SOA Suite:

These settings will be used at a later point to configure SOA Suite for BPEL with Oracle Applications Release 12.

Now we also want to verify that all is functioning with the Oracle 10g AS environment since this plays an key role in SOA Suite operations. We navigate to the main 10g AS console site.
By default this is under the URL:
http://host:port/em
For example, our test server uses http://tusebs:8889/em

Stay tuned for the next installment when we complete the steps to show you how to integrate the Oracle 10g SOA Suite with Oracle E-Business Suite Release 12!
Wednesday, September 23, 2009
Using R12 adctrl utility for managing jobs
The Oracle E-Business Suite provides a comprehensive suite of DBA utilities that every Apps DBA needs to master to be an effective EBS Applications DBA. In this blog, I will cover the useful and often misunderstood utility called ADCTRL. The adctrl utility is a key utility in the toolkit of every veteran Oracle Applications DBA professional. We will use 12.0.6 release for R12 Oracle E-Business Suite.
ADCTRL is used to manage worker processes that perform a pivotal role in the function
of batch processsing for patching and many other Applications activities.
ADCTRL is located under $AD_TOP/bin directory with Oracle E-Business Suite.
$ cd $AD_TOP/bin
To begin a new adctrl session, you enter the adctrl at a command window prompt:
$ adctrl
Copyright (c) 2002 Oracle Corporation
Redwood Shores, California, USA
AD Controller
Version 12.0.0
NOTE: You may not use this utility for custom development
unless you have written permission from Oracle Corporation.
Your default directory is '/d1/bin/apps/apps_st/appl'.
Is this the correct APPL_TOP [Yes] ?
AD Controller records your AD Controller session in a text file
you specify. Enter your AD Controller log file name or press [Return]
to accept the default file name shown in brackets.
Filename [adctrl.log] :
************* Start of AD Controller session *************
AD Controller version: 12.0.0
AD Controller started at: Wed Sep 23 2009 22:25:12
APPL_TOP is set to /EBS121/bin/apps/apps_st/appl
Reading product information from file...
Reading language and territory information from file...
Reading language information from applUS.txt ...
Enter the ORACLE username of Application Object Library [APPLSYS] : apps
Enter the ORACLE password of Application Object Library [APPS] :
AD Controller is verifying your username/password.
The status of various features in this run of AD Controller is:
<-Feature version in->
Feature Active? APPLTOP Data model Flags
------------------------------ ------- -------- ----------- -----------
CHECKFILE No 1 -1 Y N N Y N N
PREREQ No 6 -1 Y N N Y N N
CONCURRENT_SESSIONS No 2 -1 Y Y N Y Y N
PATCH_TIMING No 2 -1 Y N N Y N N
PATCH_HIST_IN_DB No 6 -1 Y N N Y N N
SCHEMA_SWAP No 1 -1 Y N N Y Y N
JAVA_WORKER No 1 -1 Y N N Y N N
CODELEVEL No 1 -1 Y N N Y N N
AD Controller Menu
---------------------------------------------------
1. Show worker status
2. Tell worker to restart a failed job
3. Tell worker to quit
4. Tell manager that a worker failed its job
5. Tell manager that a worker acknowledges quit
6. Restart a worker on the current machine
7. Exit
After you have entered the APPLMGR username and password the above menu will open for ADCTRL.
Here we have 7 options.
You can start, stop and monitor the workers. Lets monitor status of workers with option 1:
Enter your choice [1] :
Control
Worker Code Context Filename Status
------ -------- ----------------- -------------------------- --------------
1 Run Generic R120 BOMFMCPY.pll Running
2 Run Generic R120 BOMFMMDE.pll Running
3 Run Generic R120 BOMFMOPR.pll Running
4 Run Generic R120 BOMFMREV.pll Running
5 Run Generic R120 BOMFMCON.pll Running
6 Run Generic R120 BOMFMBM2.pll Running
7 Run Generic R120 BOMFMBM3.pll Running
8 Run Generic R120 BOMFMBM1.pll Running
Undocumented Option 8:
This will allow you to continue processing a job and kill the adworker that failed.
Back at the main adctrl menu choose option 8:
Enter your choice [1] : 8
Enter the worker number(s)/range(s) or 'all' for all workers,
or press [Return] to go back to the menu :
To select the "Skip worker" option, type the number 8 and
press Return.
This can be useful in testing a patch and you need to let the patch or job run to completion.
ADWORKER LOGFILES for R12 EBS
How to find the log files for these workers? It is confusing to the newbie.
cd $APPL_TOP/admin/{ORACLE_SID}
Example:
apps@sandiego:/d1/bin/apps/apps_st/appl/admin
$ cd $APPL_TOP/admin/VIS/log
to find the adworker log files we do a ls command:
apps@sandiego:/d1/bin/apps/apps_st/appl/admin/VIS/log
$ ls -ls adw*.log
45871 -rw-r--r-- 1 apps dba 46934789 Sep 23 22:19 adwork001.log
25974 -rw-r--r-- 1 apps dba 26560214 Sep 23 22:19 adwork002.log
26037 -rw-r--r-- 1 apps dba 26637070 Sep 23 22:19 adwork003.log
25251 -rw-r--r-- 1 apps dba 25824196 Sep 23 22:18 adwork004.log
16379 -rw-r--r-- 1 apps dba 16750699 Sep 23 22:18 adwork005.log
17120 -rw-r--r-- 1 apps dba 17510037 Sep 23 22:18 adwork006.log
15612 -rw-r--r-- 1 apps dba 15965759 Sep 23 22:18 adwork007.log
16177 -rw-r--r-- 1 apps dba 16543829 Sep 23 22:18 adwork008.log
For each adworker process, a log file is generated that shows activity and errors if any. Lets examine one of these log files:
************* Start of AD Worker session *************
AD Worker version: 12.0.0
AD Worker started at: Fri Sep 18 2009 16:33:10
APPL_TOP is set to /d1/bin/apps/apps_st/appl
Worker id = 1
Started by: adpatch
NLS_LANG value from the environment is : AMERICAN_AMERICA.UTF8
NLS_LANG value for this AD utility run is : AMERICAN_AMERICA.UTF8
Connecting to SYSTEM......Connected successfully.
Already asked for the ORACLE username and password
of Application Object Library.
(The given username/password was: APPLSYS/*****)
Connecting to APPLSYS......Connected successfully.
The status of various features in this run of AD Worker is:
<-Feature version in->
Feature Active? APPLTOP Data model Flags
------------------------------ ------- -------- ----------- -----------
CHECKFILE Yes 1 1 Y N N Y N Y
PREREQ Yes 6 6 Y N N Y N Y
CONCURRENT_SESSIONS No 2 2 Y Y N Y Y N
PATCH_TIMING Yes 2 2 Y N N Y N Y
PATCH_HIST_IN_DB Yes 6 6 Y N N Y N Y
SCHEMA_SWAP Yes 1 1 Y N N Y Y Y
JAVA_WORKER Yes 1 1 Y N N Y N Y
CODELEVEL Yes 1 1 Y N N Y N Y
By understanding where to find the adworker log files you can troubleshoot E-Business issues quickly and become a better DBA.
Stay tuned as we cover more Apps DBA tips in future posts!
Cheers,
Ben
ADCTRL is used to manage worker processes that perform a pivotal role in the function
of batch processsing for patching and many other Applications activities.
ADCTRL is located under $AD_TOP/bin directory with Oracle E-Business Suite.
$ cd $AD_TOP/bin
To begin a new adctrl session, you enter the adctrl at a command window prompt:
$ adctrl
Copyright (c) 2002 Oracle Corporation
Redwood Shores, California, USA
AD Controller
Version 12.0.0
NOTE: You may not use this utility for custom development
unless you have written permission from Oracle Corporation.
Your default directory is '/d1/bin/apps/apps_st/appl'.
Is this the correct APPL_TOP [Yes] ?
AD Controller records your AD Controller session in a text file
you specify. Enter your AD Controller log file name or press [Return]
to accept the default file name shown in brackets.
Filename [adctrl.log] :
************* Start of AD Controller session *************
AD Controller version: 12.0.0
AD Controller started at: Wed Sep 23 2009 22:25:12
APPL_TOP is set to /EBS121/bin/apps/apps_st/appl
Reading product information from file...
Reading language and territory information from file...
Reading language information from applUS.txt ...
Enter the ORACLE username of Application Object Library [APPLSYS] : apps
Enter the ORACLE password of Application Object Library [APPS] :
AD Controller is verifying your username/password.
The status of various features in this run of AD Controller is:
<-Feature version in->
Feature Active? APPLTOP Data model Flags
------------------------------ ------- -------- ----------- -----------
CHECKFILE No 1 -1 Y N N Y N N
PREREQ No 6 -1 Y N N Y N N
CONCURRENT_SESSIONS No 2 -1 Y Y N Y Y N
PATCH_TIMING No 2 -1 Y N N Y N N
PATCH_HIST_IN_DB No 6 -1 Y N N Y N N
SCHEMA_SWAP No 1 -1 Y N N Y Y N
JAVA_WORKER No 1 -1 Y N N Y N N
CODELEVEL No 1 -1 Y N N Y N N
AD Controller Menu
---------------------------------------------------
1. Show worker status
2. Tell worker to restart a failed job
3. Tell worker to quit
4. Tell manager that a worker failed its job
5. Tell manager that a worker acknowledges quit
6. Restart a worker on the current machine
7. Exit
After you have entered the APPLMGR username and password the above menu will open for ADCTRL.
Here we have 7 options.
You can start, stop and monitor the workers. Lets monitor status of workers with option 1:
Enter your choice [1] :
Control
Worker Code Context Filename Status
------ -------- ----------------- -------------------------- --------------
1 Run Generic R120 BOMFMCPY.pll Running
2 Run Generic R120 BOMFMMDE.pll Running
3 Run Generic R120 BOMFMOPR.pll Running
4 Run Generic R120 BOMFMREV.pll Running
5 Run Generic R120 BOMFMCON.pll Running
6 Run Generic R120 BOMFMBM2.pll Running
7 Run Generic R120 BOMFMBM3.pll Running
8 Run Generic R120 BOMFMBM1.pll Running
Undocumented Option 8:
This will allow you to continue processing a job and kill the adworker that failed.
Back at the main adctrl menu choose option 8:
Enter your choice [1] : 8
Enter the worker number(s)/range(s) or 'all' for all workers,
or press [Return] to go back to the menu :
To select the "Skip worker" option, type the number 8 and
press Return.
This can be useful in testing a patch and you need to let the patch or job run to completion.
ADWORKER LOGFILES for R12 EBS
How to find the log files for these workers? It is confusing to the newbie.
cd $APPL_TOP/admin/{ORACLE_SID}
Example:
apps@sandiego:/d1/bin/apps/apps_st/appl/admin
$ cd $APPL_TOP/admin/VIS/log
to find the adworker log files we do a ls command:
apps@sandiego:/d1/bin/apps/apps_st/appl/admin/VIS/log
$ ls -ls adw*.log
45871 -rw-r--r-- 1 apps dba 46934789 Sep 23 22:19 adwork001.log
25974 -rw-r--r-- 1 apps dba 26560214 Sep 23 22:19 adwork002.log
26037 -rw-r--r-- 1 apps dba 26637070 Sep 23 22:19 adwork003.log
25251 -rw-r--r-- 1 apps dba 25824196 Sep 23 22:18 adwork004.log
16379 -rw-r--r-- 1 apps dba 16750699 Sep 23 22:18 adwork005.log
17120 -rw-r--r-- 1 apps dba 17510037 Sep 23 22:18 adwork006.log
15612 -rw-r--r-- 1 apps dba 15965759 Sep 23 22:18 adwork007.log
16177 -rw-r--r-- 1 apps dba 16543829 Sep 23 22:18 adwork008.log
For each adworker process, a log file is generated that shows activity and errors if any. Lets examine one of these log files:
************* Start of AD Worker session *************
AD Worker version: 12.0.0
AD Worker started at: Fri Sep 18 2009 16:33:10
APPL_TOP is set to /d1/bin/apps/apps_st/appl
Worker id = 1
Started by: adpatch
NLS_LANG value from the environment is : AMERICAN_AMERICA.UTF8
NLS_LANG value for this AD utility run is : AMERICAN_AMERICA.UTF8
Connecting to SYSTEM......Connected successfully.
Already asked for the ORACLE username and password
of Application Object Library.
(The given username/password was: APPLSYS/*****)
Connecting to APPLSYS......Connected successfully.
The status of various features in this run of AD Worker is:
<-Feature version in->
Feature Active? APPLTOP Data model Flags
------------------------------ ------- -------- ----------- -----------
CHECKFILE Yes 1 1 Y N N Y N Y
PREREQ Yes 6 6 Y N N Y N Y
CONCURRENT_SESSIONS No 2 2 Y Y N Y Y N
PATCH_TIMING Yes 2 2 Y N N Y N Y
PATCH_HIST_IN_DB Yes 6 6 Y N N Y N Y
SCHEMA_SWAP Yes 1 1 Y N N Y Y Y
JAVA_WORKER Yes 1 1 Y N N Y N Y
CODELEVEL Yes 1 1 Y N N Y N Y
By understanding where to find the adworker log files you can troubleshoot E-Business issues quickly and become a better DBA.
Stay tuned as we cover more Apps DBA tips in future posts!
Cheers,
Ben
Saturday, September 12, 2009
Tips and Tricks for Installing Oracle R12 E-Business
Dear readers,
I will present a brief overview of tips for monitoring the installation of an R12 E-Business environment for Oracle Applications. For our example, we installed a fresh new Vision instance of Oracle Applications (12.0.1) running under Oracle Enterprise Linux 5.2 (32 bit). During an installation, Oracle shows a basic splash screen:

Ok thats nice but still hides much of the actual work being performed under the covers. How do we troubleshoot the installation process? Oracle writes multiple log files during each step of the process for R12 to several directories:
Database Logfile ($ORACLE_HOME):
/d01/oracle/VIS/db/tech_st/10.2.0/appsutil/log
Apps Tier Logfile ($APPL_TOP):
/d01/oracle/VIS/inst/apps/VIS_bensr12/logs

R12 has several new changes from 11i Applications, one is the new instance directory
or INST_TOP directory.


We had a file access permissions problem during the install as reviewed by the output of the logfile:

Once we fixed it and granted correct permissions to it, we were able to complete the installation. Once the installation completes, R12 completes a series of post-install checks to verify all is correct. If anything fails, the Rapid Wizard installer throws an error with a red checkmark on items that have errors.

So, how do we fix this error? We have to bounce the apps tier and it solves the login page error. To do so, we use the scripts adstpall.sh and adstrtal.sh

Once the apps middle tier is back online, we can now access the login page for R12:

and once we sign in as sysadmin we are ready for training and testing with our new R12 Vision instance:

Stay tuned for upcoming tips with patching and concurrent manager tips with R12.
I will present a brief overview of tips for monitoring the installation of an R12 E-Business environment for Oracle Applications. For our example, we installed a fresh new Vision instance of Oracle Applications (12.0.1) running under Oracle Enterprise Linux 5.2 (32 bit). During an installation, Oracle shows a basic splash screen:

Ok thats nice but still hides much of the actual work being performed under the covers. How do we troubleshoot the installation process? Oracle writes multiple log files during each step of the process for R12 to several directories:
Database Logfile ($ORACLE_HOME):
/d01/oracle/VIS/db/tech_st/10.2.0/appsutil/log
Apps Tier Logfile ($APPL_TOP):
/d01/oracle/VIS/inst/apps/VIS_bensr12/logs

R12 has several new changes from 11i Applications, one is the new instance directory
or INST_TOP directory.


We had a file access permissions problem during the install as reviewed by the output of the logfile:

Once we fixed it and granted correct permissions to it, we were able to complete the installation. Once the installation completes, R12 completes a series of post-install checks to verify all is correct. If anything fails, the Rapid Wizard installer throws an error with a red checkmark on items that have errors.

So, how do we fix this error? We have to bounce the apps tier and it solves the login page error. To do so, we use the scripts adstpall.sh and adstrtal.sh

Once the apps middle tier is back online, we can now access the login page for R12:

and once we sign in as sysadmin we are ready for training and testing with our new R12 Vision instance:

Stay tuned for upcoming tips with patching and concurrent manager tips with R12.
Subscribe to:
Posts (Atom)