Sunday, May 24, 2009

Voyage to the Mothership- Oracle HQ

It is intermission time so grab your popcorn, in our break from a pure tech topic, I want to blog on my amazing trip to the mothership, that is to Oracle headquarters in Redwood Shores! In my 12+ years of working on Oracle databases, this was my first pilgrammage to visit the campus and HQ for Oracle!


I have always wanted to take a trip to where it all began.


As an Oracle Professional, I have interviewed many times with Oracle but unfortunately it either was not the right fit or recently a hiring freeze nixed my efforts to join Oracle. It really is luck and timing. It really is about good fortune, timing and knowing the right people at the right time in life.

I finally finished my third book on Oracle database technology. What led me to the visit to Oracle HQ you might ask? I went to a session on Oracle R12: it was fun and helped to refresh my EBS DBA skills on patching, cloning, and managing Oracle 12i or R12 EBS environments. I met some cool people most of the class works for Oracle support! It was fun! And I even managed to fix my errors in my VMWare configuration for R12 EBS on Oracle Enterprise Linux! Had to fix routing and network configuration issues then had to stop and restart the apps tier services. And voila! Now my VMWare works for R12! Woohoo!

I can say this: if you have the golden opportunity to visit Oracle HQ: take it! Oracle employees at HQ in Redwood Shores are blessed to work on one of the nicest corporate environments. Period. From the amazing fitness center with classes, gym, and Olympic swimming pool to amazing gourmet meals served at the many cafes on campus at budget prices (I had a grilled NY strip steak for less than $8!), people seem happy to work for and at Oracle! That explains why Oracle DEMANDS Ivy League pedigrees from many potential employees such as Stanford. I ran into Julian Dyke while learning new features for R12. Such a great RAC expert and very nice guy. Funny the people we run into by chance. Now, I did a session at another Oracle center in Los Angeles and in stark contrast, the center was NOT as nice as Oracle HQ! Views of Barbie and Mattel do not compare to the serenity of Oracle HQ!


Besides the 20 foot parking structure with Ken and Barbie, I really was not impressed by El Segundo, California and the one floor that Oracle training occupies there. But, a short 2 hour drive was more convenient from San Diego than the flight required to SFO for my visit to Oracle HQ. Was it worth it? Heck yeah, and if I am lucky to meet Larry someday and can pick his brain for a few minutes, perhaps I can make the planet a better and happier place with less suffering,

Friday, May 22, 2009

Oracle R12 EBS Applications with Oracle 10g Application Server

Dear readers,

We will provide some tips on how to integrate key features of Oracle 10gAS with the R12 EBS Applications suite.
First, we will provide a quick summary of the architecture that exists within Oracle E-Business Suite Release 12 in terms of
Oracle 10gAS.

Oracle Metalink Note # 415007.1 is a FAQ that provides a useful summary of ways to integrate the Oracle R12 EBS Suite with Oracle 10g Application Server. Even though Oracle Weblogic is the heir apparent for future Application Server/Fusion Middleware directions as evidenced by the SOA suite products, fact is that Oracle 10g Application Server is the core middleware technology at work for Oracle R12 Applications E-Business Suite.

One key difference between a stand alone Oracle 10g Application Server environment versus R12 EBS is that the
Oracle 10gAS Infrastructure is NOT SUPPORTED in the Release 12 of Oracle E-Business Suite for Oracle 12i Applications. Oracle Metalink Note 251627.1tells further details on how to workaround this issue.


Oracle Application Server 10g integration with Oracle EBS R12


Oracle EBS R12 uses many of the components that exist in Oracle 10g Application Server. For Oracle R12, these include:

- OHS- the Oracle HTTP Server (Apache 1.3)
- PL/SQL
- Forms Server
- Reports Server
- OC4J- Oracle Containers for J2EE


What versions of Oracle Application Server 10g can be used with Oracle E-Business Suite Release 12?


Oracle EB R12 has an Oracle 10g application server instance (10.1.2) that runs the Forms and Reports Services. In addition to this application server instance, we also have a secondary application server instance (10.1.3) which is used to run the OC4J instance. By default, when you install Oracle EBS R12, these 10gAS instances are installed and created by the R12 Rapid Install process.

Oracle R12 EBS supports the following Oracle Application Server 10g services:

Single Sign-On 10g (10.1.2.0.2)
Oracle Internet Directory 10g (10.1.2.0.2)
Portal 10g (10.1.4)
Discoverer 10g (10.1.2.0.2)
Web Cache 10g (10.1.2.0.2)
Oracle Business Integration 10g (10.1.3)
Oracle BPEL Process Manager 10g (10.1.3)

A complete discussion on how to setup and configure all of these products with EBS R12 would require a book in itself so I will kindly refer you to the Oracle EBS R12 Tech Stack Roadmap guide available in Oracle Metalink Note # 380482.1

Our main discussion will now shift to SSL and R12 EBS for Oracle 10g Application Server.

I have two homework assignments for you, besides the previous Metalink notes, I have another humble request. Either download or order the 29 DVDs for R12 EBS. Install a new test instance single tier for R12. You can do this at low cost with an external 250Gb portable drive, low cost laptop with 2-4Gb RAM, and VMWare. I built my R12 EBS test environment on Oracle Enterprise Linux for under $1000 and this included all softwares which are available from the Oracle Edelivery store (about $125 for non-commercial usage trial learning versions). Second, the following Metalink Notes are germane to our discussion for SSL, OID, and SSO with R12 EBS and Oracle 10g Application Server.

Note 376811.1, Integrating Oracle E-Business Suite Release 12 with Oracle Internet Directory and Oracle Single Sign-On

Note 403537.1, Best Practices for Securing Oracle E-Business Suite Release 12
Note 376694.1, Using the Oracle Wallet Manager Command Line Interface with Oracle E-Business Suite Release 12
Note 376700.1, Enabling SSL in Oracle Applications Release 12
Note 380490.1, Oracle E-Business Suite Release 12 Configuration in a DMZ

Since we already covered OID and SSO in great detail, for now, I will focus on SSL and R12 EBS for Oracle 10g Application Server.

SSL and Oracle 12i (Release 12) Applications


For us, the biggest change for using the Secure Sockets Layer (SSL) in terms of R12 and Oracle 10gAS is the use of mod_ossl module (plugin) for the Oracle HTTP Server (OHS). Both mod_ssl and mod_ossl enable strong cryptography for OHS (Apache 1.3). However, the key difference to note here is that mod_ossl is based on Oracle's implementation of SSL which supports SSL 3.

Oracle R12 EBS manages SSL certificates from the Oracle Wallet Manager (OWM) which we saw earlier in addition, we can also manage the wallets for SSL certificates with the new ORAPKI command line interface (CLI). The good news here for Oracle EBS, is that R12 now uses the Forms Listener Servlet, so we do not have a Forms server that existed in earlier releases of EBS such as 11i. This means that a separate certificate is no longer needed for Forms. Forms share the same wallet as the Oracle HTTP Server (OHS). However, I would like to point out an important caveat or gotcha. We no longer can use the Forms Server listener with the ConnectMode=https. This is no longer supported in Release 12i for Oracle E-Business Applications with R12. For R12 EBS, ConnectMode=https will only work with the JInitiator that contains the Oracle SSL libraries. Release 12 uses Sun's Java Plugin so in case you need to use https for the forms communication layer, it is imperative that you use the servlet architecture.

Middle Tier Configuration Steps to Enable SSL with Oracle R12 Applications


By default the location for the Oracle wallet in R12 is under $INST_TOP/certs/Apache. This directory contains a wallet with demo certificates. If you wish to use these certificates for testing start with Step 8 below to configure SSL, and then do Steps 1 through 7 when you are ready to switch to real certificates.

The demo certificates are not secure and should never be used in a production environment.

The main steps for setting up SSL on the Middle Tier are:

1. Set Your Environment.
2. Create a wallet.
3. Create a Certificate Request.
4. Submit the Certificate Request to a Certifying Authority.
5. Import your Server Certificate to the Wallet.
6. Copy the Apache Wallet to the OPMN Wallet.
7. Update the JDK Cacerts File.
8. Update the Context File.
9. Run Autoconfig.
10. Restart the middle tier services.

We will use the Oracle Wallet Manager (OWM) to configure SSL and certificates.
An optional method is to use the CLI (Command Line Interface) with Oracle Wallet Manager for R12. To do so, I refer you to Oracle Metalink Note# 376694.1: Using the Oracle Wallet Manager Command Line Interface in Release 12. Ready for some real fun? OK! Great, lets configure SSL for Oracle E-Business Release 12i.

Set the R12 Environment

Login as applmgr or the OS user who owns the Apps Tier for your Oracle 12i EBS environment.
Source the environment file

[applmgr@ebs scripts]$ whoami
applmgr
[applmgr@ebs scripts]$ cd $APPL_TOP
[applmgr@ebs appl]$ . APPSPROD_ebs.env
[applmgr@ebs appl]$


Create the Wallet


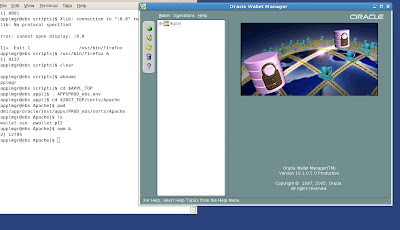
Navigate to $INST_TOP/certs/Apache directory to create the new wallet.

[applmgr@ebs appl]$ cd $INST_TOP/certs/Apache
[applmgr@ebs Apache]$ pwd
/d01/app/oracle/inst/apps/PROD_ebs/certs/Apache
[applmgr@ebs Apache]$ ls
cwallet.sso ewallet.p12

You should see the demo wallets that Rapid Install created after R12 was installed as shown above. Start the OWM (Oracle Wallet Manager) as shown in the figure example listed below.


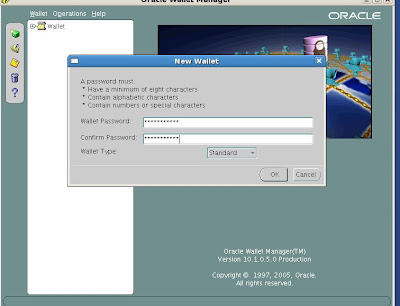
Select the option Wallet-> New
It will prompt you with “Your default wallet directory doesn't exist. Do you wish to create it now?” Choose No.


The new wallet screen will now prompt you to enter a password for your wallet.
Enter the password


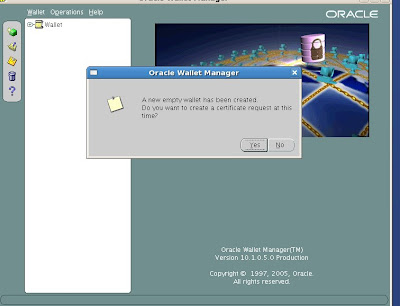
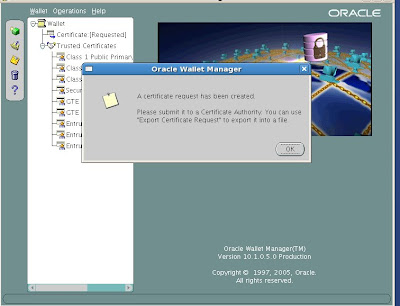
The new empty wallet is created. We do need to create the new certificate request so choose yes.


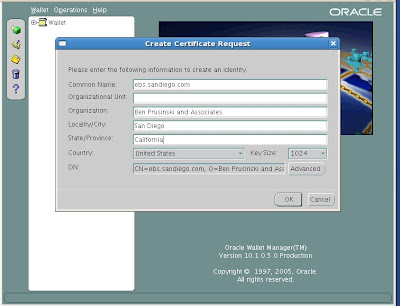
Common Name: is the name of your server including the domain.
Organizational Unit: (optional) The unit within your organization.
Organization: is the name of your organization.
Locality/City: is your locality or city.
State/Province: is the full name of your State or Province - do not abbreviate.

Select your Country from the drop down list.
Click OK.


Submit the Certificate Request to a Certifying Authority (CA)


We see our new wallet details below.


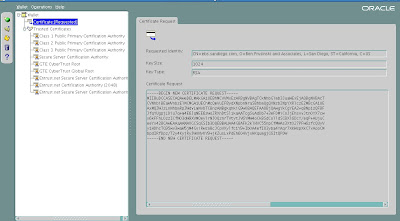
Now that we have our new wallet, we will need to export the Certificate Request and then submit it to a Certifying Authority (CA). Here are the steps.


Click on Certificate [Requested] to Highlight it.
From the menu click Operations -> Export Certificate Request


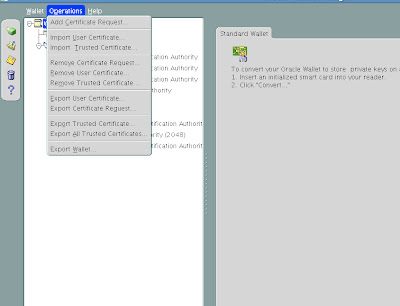
Save the file as server.csr
From the menu click Wallet and then click Save.


Change the Directory to the fully qualified wallet directory which in our case would be
/d01/app/oracle/inst/apps/PROD_ebs/certs/Apache


Click the OK button.


From the menu click Wallet and check the Auto Login box.


We will need to use the password whenever we open the wallet with Oracle Wallet Manager or if we ever need to perform operations on the wallet. Auto login allows for simplified maintenance tasks in the future.

Exit out of OWM

Our wallet directory now contains the following files:

[applmgr@ebs Apache]$ whoami;pwd;ls
applmgr
/d01/app/oracle/inst/apps/PROD_ebs/certs/Apache
cwallet.sso ewallet.p12 server.csr


Import Server Certificate to the Wallet.


Once we have received our Server Certificate the Certifying Authority (CA) we need to import it into our wallet. We copy the certificate to server.crt in the wallet directory by either using ftp or copy and paste into a server.crt file.
We use OWM (Oracle Wallet Manager) to perform this task.


Modify Wallet for Oracle Process and Notification Manager (OPMN)


Oracle Applications R12 Rapid Install creates a default "demo" type opmn wallet in the $INST_TOP/certs/opmn directory that is available for basic SSL testing. Now that the Apache wallet has been created for us, we need to to use these same certificates for opmn. We need to perform the the following steps to backup and copy the wallets:

Navigate to the $INST_TOP/certs/opmn directory.
Create a new directory named BAK
Move the ewallet.p12 and cwallet.sso files to the BAK directory just created.
Copy the ewallet.p12 and cwallet.sso files from the $INST_TOP/certs/Apache directory to the $INST_TOP/certs/opmn directory.


[applmgr@ebs Apache]$ cd $INST_TOP/certs/opmn
[applmgr@ebs opmn]$ mkdir BAK
[applmgr@ebs opmn]$ cp /d01/app/oracle/inst/apps/PROD_ebs/certs/Apache/e* cw* $INST_TOP/certs/opmn/BAK

[applmgr@ebs BAK]$ pwd
/d01/app/oracle/inst/apps/PROD_ebs/certs/opmn/BAK
[applmgr@ebs BAK]$ ls
cwallet.sso ewallet.p12


Make SSL Updates for R12 EBS Context File.


Now we need to update our R12 EBS Context file variables to account for SSL configuration.
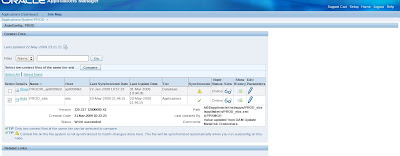
To do so, we need to use the Oracle Applications Manager (OAM) Context Editor to change the SSL related variables as shown in the following screenshots.


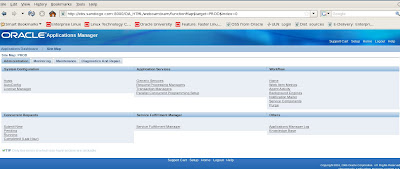
We choose AutoConfig under System Configuration on the Oracle 12i Applications Manager (OAM) interface to access our context files.


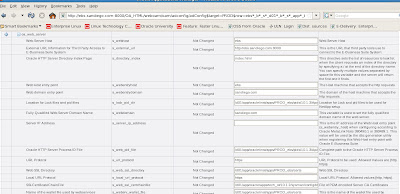
Now we need to edit the Context file for Apps Tier to enable SSL for R12 E-Business environment.
Change variables for s_url_protocol from http to https for SSL and make sure to set the s_webssl_port to 4433 which is the default SSL port. Below is an example.


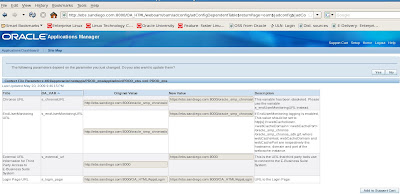
Finalize changes for R12 EBS and SSL Configuration - Autoconfig


Now we need to run the Autoconfig utility to have our changes made to our R12 context file for SSL. We do this by executing the adautocfg.sh script located in the Middle Tier (Apps Tier) under the $ADMIN_SCRIPTS_HOME directory.

$ cd $ADMIN_SCRIPTS_HOME
[applmgr@ebs scripts]$ ls
adalnctl.sh adcmctl.sh adformsrvctl.sh adopmnctl.sh adstrtal.sh java.sh L308828.log sqlnet.log
adapcctl.sh adexecsql.pl adoacorectl.sh adpreclone.pl gsmstart.sh jtffmctl.sh mwactl.sh
adautocfg.sh adformsctl.sh adoafmctl.sh adstpall.sh ieo L308827.log mwactlwrpr.sh

$ adautocfg.sh
Enter the APPS user password:

The log file for this session is located at: /d01/app/oracle/inst/apps/PROD_ebs/admin/log/05222339/adconfig.log

AutoConfig is configuring the Applications environment...

AutoConfig will consider the custom templates if present.
Using CONFIG_HOME location : /d01/app/oracle/inst/apps/PROD_ebs
Classpath : /d01/app/oracle/apps/apps_st/comn/java/lib/appsborg2.zip:/d01/app/oracle/apps/apps_st/comn/java/classes

Using Context file : /d01/app/oracle/inst/apps/PROD_ebs/appl/admin/PROD_ebs.xml

Context Value Management will now update the Context file
The log file for this session is located at: /d01/app/oracle/inst/apps/PROD_ebs/admin/log/05222339/adconfig.log

AutoConfig is configuring the Applications environment...

Context Value Management will now update the Context file

Updating Context file...COMPLETED

Attempting upload of Context file and templates to database...COMPLETED

Configuring templates from all of the product tops...
Configuring AD_TOP........COMPLETED
Configuring FND_TOP.......COMPLETED
Configuring ICX_TOP.......COMPLETED
Configuring IEO_TOP.......COMPLETED
Configuring BIS_TOP.......COMPLETED
Configuring AMS_TOP.......COMPLETED
Configuring CCT_TOP.......COMPLETED
Configuring WSH_TOP.......COMPLETED
Configuring CLN_TOP.......COMPLETED
Configuring OKE_TOP.......COMPLETED
Configuring OKL_TOP.......COMPLETED
Configuring OKS_TOP.......COMPLETED
Configuring CSF_TOP.......COMPLETED
Configuring IGS_TOP.......COMPLETED
Configuring IBY_TOP.......COMPLETED
Configuring JTF_TOP.......COMPLETED
Configuring MWA_TOP.......COMPLETED
Configuring CN_TOP........COMPLETED
Configuring CSI_TOP.......COMPLETED
Configuring WIP_TOP.......COMPLETED
Configuring CSE_TOP.......COMPLETED
Configuring EAM_TOP.......COMPLETED
Configuring FTE_TOP.......COMPLETED
Configuring ONT_TOP.......COMPLETED
Configuring AR_TOP........COMPLETED
Configuring AHL_TOP.......COMPLETED
Configuring OZF_TOP.......COMPLETED
Configuring IES_TOP.......COMPLETED
Configuring CSD_TOP.......COMPLETED
Configuring IGC_TOP.......COMPLETED

AutoConfig completed successfully.
[applmgr@ebs scripts]$


Restart Apps R12 EBS middle tier services.


Our final step on the road to SSL for Oracle Release 12 for the E-Business Suite is to stop and restart the middle tier services. We use the adapcctl.sh script located in the $ADMIN_SCRIPTS_HOME directory to stop and restart the middle tier Apache services.

[applmgr@ebs scripts]$ adapcctl.sh stop

You are running adapcctl.sh version 120.6.12000000.2

Stopping OPMN managed Oracle HTTP Server (OHS) instance ...

adapcctl.sh: exiting with status 0

adapcctl.sh: check the logfile /d01/app/oracle/inst/apps/PROD_ebs/logs/appl/admin/log/adapcctl.txt for more information ...

[applmgr@ebs scripts]$ adapcctl.sh start

You are running adapcctl.sh version 120.6.12000000.2

Starting OPMN managed Oracle HTTP Server (OHS) instance ...

adapcctl.sh: exiting with status 0

adapcctl.sh: check the logfile /d01/app/oracle/inst/apps/PROD_ebs/logs/appl/admin/log/adapcctl.txt for more information ...

[applmgr@ebs scripts]$ adapcctl.sh status

You are running adapcctl.sh version 120.6.12000000.2

Checking status of OPMN managed Oracle HTTP Server (OHS) instance ...

Processes in Instance: PROD_ebs.ebs.sandiego.com
-------------------+--------------------+---------+---------
ias-component | process-type | pid | status
-------------------+--------------------+---------+---------
OC4J | oafm | 8269 | Alive
OC4J | forms | 8267 | Alive
OC4J | oacore | 8268 | Alive
HTTP_Server | HTTP_Server | 21490 | Alive


adapcctl.sh: exiting with status 0

adapcctl.sh: check the logfile /d01/app/oracle/inst/apps/PROD_ebs/logs/appl/admin/log/adapcctl.txt for more information ...


There are of course many advanced options for SSL configuration beyond the scope of what we have covered today. I encourage you to dig deeper into the above reference Metalink notes and test to find out what SSL options will benefit your Oracle E-Business Release 12 environments. As you can now see, SSL configuration requires different steps for the E-Business Suite than for a stand alone Oracle 10g Application Server environment. Until next time where we provide some troubleshooting tips on Oracle 10g Application Server.

Cheers,
Ben

Saturday, May 16, 2009

Part 3: SSL Configuration with Oracle HTTP Server (OHS)

Dear readers,

In the first two parts, we illustrated how to configure the core functions for Identity Management (IdM) with Oracle 10gAS Fusion Middleware. In this section, we will explain how to setup the Oracle HTTP Server or OHS for SSL with Oracle 10g Application Server. OHS is Oracle's implementation of the Apache 1.3 webserver which is an integral component of the Oracle Fusion Middleware technology. In addition to playing a pivotal role in the Oracle 10gAS, OHS is a key ingredient in the Oracle Applications EBS technology stack. With SSL, we can secure HTTP communication between the user's web browser and OHS web server. OHS uses the mod_ossl module or plugin to implement SSL within the web server which fully supports SSL 3.0 standards.

We also have a useful SSL configuration tool (SSLConfigTool) that we will see later on in our discussion which automates many of the steps for us to secure the HTTP protocol with OHS. The SSLConfigTool is located under $ORACLE_HOME/bin directory.

How to Configure SSL with OHS


To configure OHS with SSL, we need to modify the httpd.conf configuration file for OHS to tell Apache 1.3 ahem, OHS server
that it will use SSL for security settings. The httpd.conf file is located under the $ORACLE_HOME/Apache/Apache/conf directory.
The following parameters are key to understanding SSL configurations with OHS:

- ServerName the server which will be enabled for SSL
- SSLWallet File directory path location for the server wallet
- SSLEngine setting to either enable or disable SSL
- SSLVerifyClient verification type for client certificates
we have three options here: none which means SSL without certificates
Optional- only user server certificate
Require: use both server and client certificates


Once we have configured OHS for SSL, we can access the OHS server from secure HTTPS protocol
from the host with https://hostname.domain:4443

Oracle OHS uses the port 4443 as the default port for SSL communications


Now, lets take a look at our current OHS httpd.conf configuration file settings


##
## httpd.conf -- Apache HTTP server configuration file
##

#
# Based upon the NCSA server configuration files originally by Rob McCool.
#
# This is the main Apache server configuration file. It contains the
# configuration directives that give the server its instructions.
# See for detailed information about
# the directives.
#
# Do NOT simply read the instructions in here without understanding
# what they do. They're here only as hints or reminders. If you are unsure
# consult the online docs. You have been warned.
#
# After this file is processed, the server will look for and process
# /home/oracle/infra/Apache/Apache/conf/srm.conf and then /home/oracle/infra/Apache/Apache/conf/access.conf
# unless you have overridden these with ResourceConfig and/or
# AccessConfig directives here.
#
# The configuration directives are grouped into three basic sections:
# 1. Directives that control the operation of the Apache server process as a
# whole (the 'global environment').
# 2. Directives that define the parameters of the 'main' or 'default' server,
# which responds to requests that aren't handled by a virtual host.
# These directives also provide default values for the settings
### Section 1: Global Environment
#
# The directives in this section affect the overall operation of Apache,
# such as the number of concurrent requests it can handle or where it
# can find its configuration files.
#

#
# ServerType is either inetd, or standalone. Inetd mode is only supported on
# Unix platforms.
#
ServerType standalone
#
# ServerRoot: The top of the directory tree under which the server's
# configuration, error, and log files are kept.
#
# NOTE! If you intend to place this on an NFS (or otherwise network)
# mounted filesystem then please read the LockFile documentation
# (available at );
# you will save yourself a lot of trouble.
#
# Do NOT add a slash at the end of the directory path.
#
ServerRoot "/home/oracle/infra/Apache/Apache"
#
# The LockFile directive sets the path to the lockfile used when Apache
# is compiled with either USE_FCNTL_SERIALIZED_ACCEPT or
# USE_FLOCK_SERIALIZED_ACCEPT. This directive should normally be left at
# Port: The port to which the standalone server listens. For
# ports < 1024, you will need httpd to be run as root initially.
#
# This port is used when starting without SSL
Port 7777
Listen 7777
#
# If you wish httpd to run as a different user or group, you must run
# httpd as root initially and it will switch.
#
# User/Group: The name (or #number) of the user/group to run httpd as.
# . On SCO (ODT 3) use "User nouser" and "Group nogroup".
# . On HPUX you may not be able to use shared memory as nobody, and the
# suggested workaround is to create a user www and use that user.
# NOTE that some kernels refuse to setgid(Group) or semctl(IPC_SET)
# when the value of (unsigned)Group is above 60000;
# don't use Group nobody on these systems!
#
User oracle
Group oinstall
#
ServerName sandiego.localdomain
#
# DocumentRoot: The directory out of which you will serve your
# documents. By default, all requests are taken from this directory, but
# symbolic links and aliases may be used to point to other locations.
#
DocumentRoot "/home/oracle/infra/Apache/Apache/htdocs"

#
# Each directory to which Apache has access, can be configured with respect
# to which services and features are allowed and/or disabled in that
# directory (and its subdirectories).
#
# First, we configure the "default" to be a very restrictive set of
# permissions.
#

Options FollowSymLinks MultiViews
AllowOverride None


We also need to update settings for the Oracle Process Manager and Notification (OPMN) for our Portal 10gAS instance
by changing settings for the opmn.xml configuration file located under the $PORTAL_HOME/opmn/conf directory. We can either edit this configuration file for Portal directly or more conveniently, to use the Oracle 10gAS Application Server Control for the Portal instance under Process Management tab. Below is our sample opmn.xml config file for Portal:

Of note here for our purposes, is that we need to enable SSL communication for the OHS HTTP Apache 1.3.x web server. By default, SSL is NOT enabled! So we need to find the section in the opmn.xml file that references the HTTP server. Below is the relevant section:

ias-component id="HTTP_Server"
process-type id="HTTP_Server" module-id="OHS"
module-data
category id="start-parameters"
data id="start-mode" value="ssl-disabled"

We need to change this to "ssl-enabled" and resync OHS to allow SSL settings to take affect.


I prefer to use Application Server control because if we edit the opmn.xml file directly, we need to resync it manually which can be a pain. Application Control Server does this automatically for us. Under the main Portal instance page for 10gAS, we navigate to Process Management as shown below


This brings us directly to the editor for the opmn.xml file and we update it to enable the SSL option


We apply the changes.


Now we need to verify that our certificates can be accepted and then apply final configuration changes to the OHS httpd.conf file to ensure SSL communications function correctly. First, we need to navigate to the Oracle Certificate Authority (OCA) user page. We also need to clear out our web browser and remove old certificates since we are using the same server for our testing purposes.


We use our administrator account and password to login via SSO


Once we login, we can view certificates that we created earlier


We choose to get our certificate by choosing the option Get Certificate which will be used for future SSL communications


Details for the certificates are shown below.


Now we need to add the directives to the Portal Instance OHS web server to complete our setup for enabling SSL with Oracle
10g Application Server.


To complete our SSL tasks for OHS, we need to select Advanced Server Properties tab in the HTTP Server administration web page.


Since the httpd.conf configuration file for OHS is what need to modify to complete our SSL setup for Oracle HTTP Server, we click on the link.

We need to add a couple of directives to our Apache (OHS) httpd.conf configuration file to enable SSL.

SSLVerifyClient require


We then click the Apply button and OHS will need to restart the web server to apply our changes for SSL. Be careful editing this file since any typos will cause the OHS web server to fail to restart.


Now hopefully, our Apache web server OHS restarts with the enabled SSL changes.

A good reference for Apache and OHS since OHS really is Oracle's rebranded version of the Apache 1.3 web server is to consult the Apache main site http://apache.org

For reference on the Apache and OHS SSL directives the link
http://httpd.apache.org/docs/2.2/mod/mod_ssl.html has excellent supplemental details.

Friday, May 15, 2009

Part 2: SSL Configuration with Oracle Wallet Manager and SSO

In our last post, we introduced the concepts of SSL for Oracle Fusion Middleware with Oracle 10gAS in terms of concepts with how to manage the certificate authority (CA) with SSL and the Oracle Certificate Authority (OCA) server.

Upon a review of support notes from Oracle Metalink, the following notes will come in useful for our in depth analysis and review of how to manage SSL with Oracle 10gAS:


Note: 351341.1 - How To Setup and Configure SSO/OHS for SSL
Note 351340.1 - How To Create SSL Wallet Using Wallet Manager and Oracle Certificate Authority
Note 351365.1 - How To Set up and Configure SSO and OIDDAS to use SSL


I highly recommend that all Oracle DBAs and analysts read and digest these Metalink support notes before you configure SSL for Oracle 10g Application Server so that problems are avoided and success ensured for your SSL administration tasks. By doing so, you will prevent many headaches and avoid potential gotchas. I usually make a point to read the release notes and Metalink notes before I perform a major task for a new environment as it saves me hours of frustration. Since we are using a demo lab based environment, some of these tasks from Metalink will not apply but the key concepts still are valid. Now lets move on from where we left off last time which is to configure the Oracle Wallet Manager (OWM) environment so that we can setup a new set of wallets for our certificates for use with SSL and Oracle 10g Application Server.

Now that we have setup our Oracle Certificate Authority (OCA) to use trusted certificates for SSL connections, we can proceed to configure new wallets with Oracle Wallet Manager (OWM) for Oracle 10g Application Server. In contrast to the OCA administration pages located under https://server:/oca/admin we need to check on the user OCA pages by navigating to the pages for user certificates under https://server:/oca/user as shown below figure example.


This differs from the OCA administrator site that provides maintenance options for certificate management with the Oracle certificate authority (OCA) in that user certificates can be viewed and managed on the user site.


From the user menu sitre we can trust and view the certificates to be authenticated by Oracle 10g Application server.
We can also import the Certificate Revoke Lists (CRL) that we saw earlier.


Now lets try to see if our previous certificate is accepted when we attempt to connect to SSO and OCA via SSL.
We click on the right tab option for User Certificates


We try the option by using our existing certificate


OK, so we have several things that we can do from this screen. We can examine the certificate in further detail as well as update the CRL (Certificate Revocation list), get the certificate, as well as change authentication options.

If we choose to get our certificate we can update options for managing our certificate. Now, we need to configure our server side certificate options. For this task, we need to use the Oracle Wallet Manager (OWM)

Oracle Wallet Manager (OWM)


So at this point you are probably wondering, what exactly does this Oracle Wallet Manager (OWM) do and why do I need it? Well, the Oracle Wallet Manager (OWM) is an integral component of SSL authentication. As such, it performs the following key tasks for Identity Management with Oracle 10g Application Server for SSL:

- generates public/private key pair
- creates certificate request
- installs certificates
- configures trusted certificates
- creates the wallet which is accessed by the Oracle Wallet Manager (OWM)
- uploads contents of wallet to LDAP directory systems such as Oracle Internet Directory (OID)
- imports and exports wallets

The Oracle Wallet Manager tool (OWM) is located under $ORACLE_HOME/bin directory for the Oracle 10gAS Infrastructure environment. New wallets must use a password based on the following standard of minimum 8 characters with at least one alphabetic and numeric or special character. The OWM users trusted and user based certificates. One caveat is that you need to install a trusted certificate first before using a user certificate issued by the certificate authority (CA). Wallets can be exported and imported as well. We also will need to configure our end user web browser to trust the OCA. This varies based on your browser version and configuration. We will provide an example of this shortly.

We also need to enable the Oracle HTTP (Apache 1.3) server (OHS) to use SSL. This will be discussed in the third installment for SSL and Oracle 10gAS. Finally, we need to use the SSL configuration tool to automate changes for securing HTTP. Furthernmore, we need to add user certificates to the Oracle Internet Directory (OID) via the ldapmodify command or via an ldif file.


Since we are using a single web browser for our lab environment and Mozilla Firefox in this case, we need to clear out old certificates before we configure a new wallet for Oracle 10g Application Server. We also need to enable Mozilla Firefox to accept certificates. Under our browser window we need to EDIT->PREFERENCES which brings up the options for certificates.


Make sure to select the option for "Ask Every Time" otherwise errors may occur for our certificate authentication processing.
We also need to clean out old OCA web administrator certificates from previous tasks. To do this, we need to stop and restart our OCA server. We can use the $ORACLE_HOME/oca/bin/ocactl stop then $ORACLE_HOME/oca/bin/ocactl revokecert and then restart OCA server with the $ORACLE_HOME/oca/bin/ocactl start command as shown in the following example.


Now we are all set and ready to create a new wallet! To start the Oracle Wallet Manager (OWM) we simply open another terminal shell command window and execute the owm from $ORACLE_HOME/bin directory


From the main OWM screen, we can perform many tasks such as creating new wallets, importing or exporting wallets just to name a few tasks. Now let's create a new wallet.


Oracle Wallet Manager (OWM) asks us if we wish to create a new default wallet. We choose Yes and it complains that it cannot create a default wallet in the system directory with message of "Unable to create system default wallet directory."


We continue anyways and ignore the error warning message


Now we need to enter a wallet password and choose authentication option


We have a choice between standard wallet type of PKCS11 wallet type that we discussed earlier. Lets keep with standard wallet type for sake of simplicity.


Our wallet is created successfully and OWM asks us if we would like to create a new certificate request to link to the new wallet. Since we need to do this, we enter the following details for our new certificate request. We choose to keep the default key size to 1024 bits.


We confirm our choices for the new certificate request and click the OK button.

Now we can see that the new certificate request has been successfully created by OWM.


We still need to submit the certificate for acceptance to the OCA via the user pages that we saw earlier.
To view and obtain the details for our new certificate created by OWM we can examine the details under the menu tree for Wallet-> Certificate [Requested] as shown in the figure example below:


What we need to do is to clear entries from the web browser so that old certificates do not appear since we want to login to the OCA as a user and not as an administrator.


Also be sure to delete old certificates to avoid problems since in our test environment we have a single web browser and server used. Now we need to return back to our OWM window that had the certificate details from our newly created certificate request. Open a new browser window in tandem with having OWM open and connect to the Oracle Certificate Authority User page via SSL based on https://host_name.:/oca/user

In our case, we connect to SSL port 6600


Now we need to copy the certificate details from our new certificate request from OWM from BEGIN NEW CERTIFICATE REQUEST until END NEW CERTIFICATE REQUEST

Move back to the User OCA page and click on Request a new certificate on the Server/SubCA Certificates tab


Now we need to choose the option "Request A Certificate"

Paste the new certificate request encrypted details from OWM into the main field as shown below


Enter personal information in the fields and click OK to submit the request to the OCA.


Now we need to generate the server certificate. Click the Submit button. We verify that it is accepted by the OCA


Our certificate request has been accepted and stored in the OID server. Now we can exit OWM and need to approve the new certificate request from the OCA Administration page. We can cancel saving the new wallet as that is not required. Now lets take a look at how to approve the new certificate request.

Since we are doing this on same server and web browser we need to shutdown the OCA server, revoke old admin certificates, remove them from our browser and restart the OCA services.


We now see the new certificate details for review to either approve or reject the requests


Lets go ahead and approve the new certificate request by View Details


When we submit approval the OCA prompts us once more to make sure we wish to approve the new certificate request


Our new certificate request is approved status and shown below


Now we can verify that the newly created certificate request is available with OCA


We can also verify the encoded certificate details given in BASE64 format:


We will continue our setup for SSL with Oracle 10g Application server in the next installment as the final steps require us to modify configuration to the OHS (Oracle HTTP Server aka Apache 1.3).